Dynamic DNS Configuration
This guide will walk you through the process of setting up Dynamic DNS (DDNS) in Poweradmin.
Setting Up User Permissions
You'll need to create a dedicated user with specific permissions for DDNS updates:
Administrator (ueberuser) accounts are deliberately blocked from
dynamic_update.php. DDNS credentials are typically stored in plaintext on routers, IoT devices, orddclient.conffiles - low-trust locations. Forcing a dedicated, narrowly-scoped account keeps admin credentials out of those files. If you authenticate with an admin account, the endpoint responds withbadauth2.
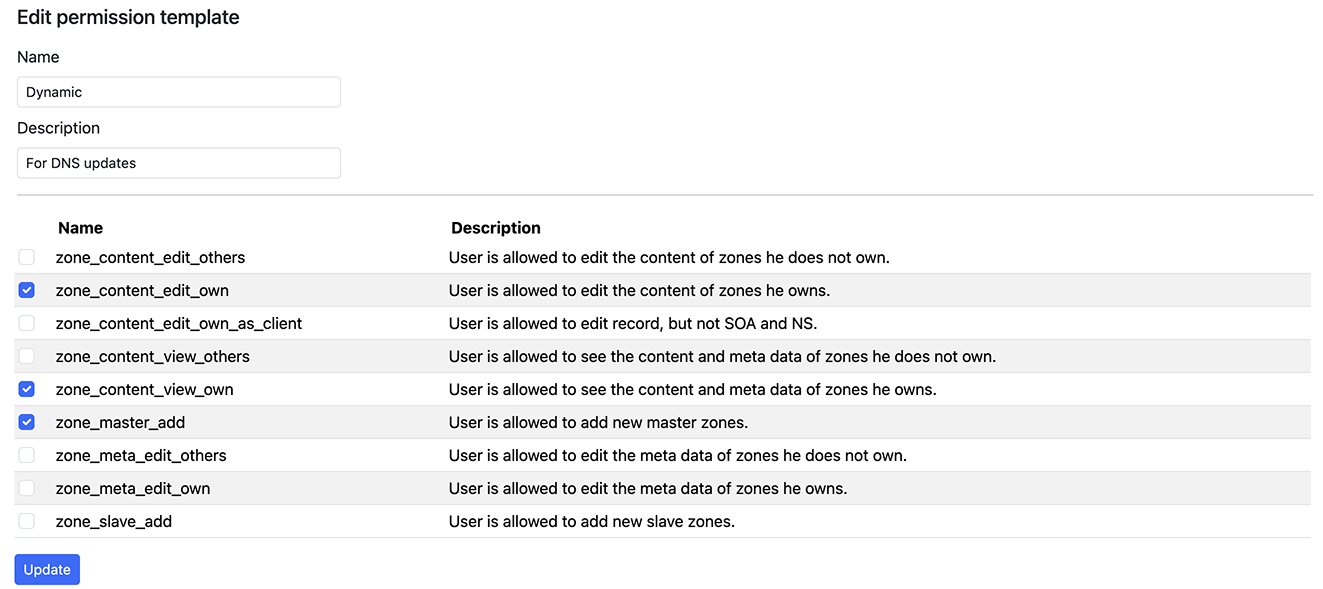
- Create a permission template:
- Navigate to
Users > Add permission template - Provide a meaningful name (e.g., "dynamic") and description
- Select required permissions:
zone_master_addzone_content_view_ownzone_content_edit_ownorzone_content_edit_own_as_clientorzone_content_edit_others
- Navigate to
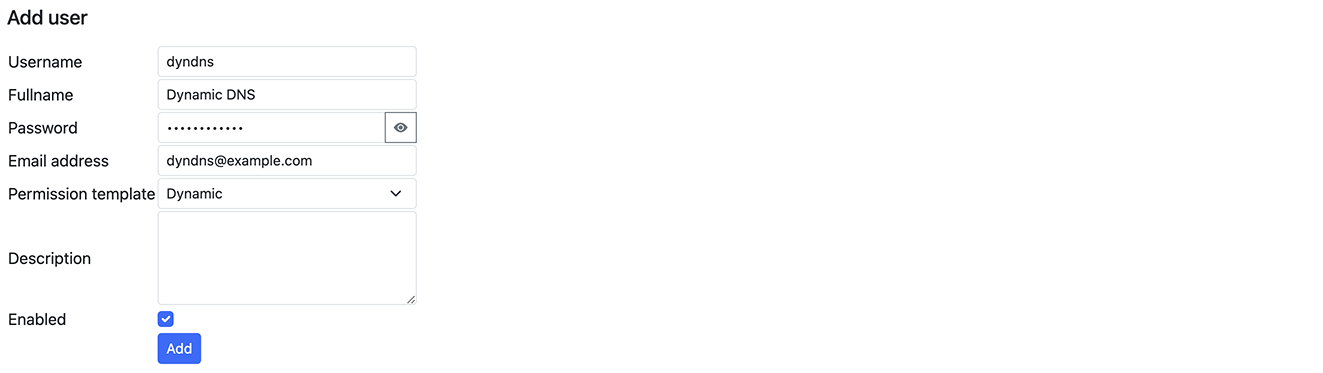
- Create a new user:
- Navigate to
Users > Add user - Fill in user details
- Apply the previously created template
- Navigate to
Configuring DNS Zone
After creating a user with appropriate permissions:
- Log in as the new user
- Select "Add master zone"
- Enter your domain name
- Navigate to the created zone
- Add a record for dynamic updates


Server-Side Configuration
The Dynamic DNS functionality in Poweradmin is provided by the dynamic_update.php script, which handles DNS record updates when IP addresses change.
Current Behaviour
There are no dedicated configuration keys for DDNS. The endpoint is always available when the file is reachable, and the following values are fixed:
- TTL: All A and AAAA records created or refreshed through
dynamic_update.phpare written with a TTL of 60 seconds. This is hard-coded. - Authentication: Always required (HTTP Basic Auth or
username/passwordquery parameters). - IPv4 and IPv6: Both are always allowed; you control which records exist by what you send.
- Automatic IP detection: Always available via the special value
whatismyipformyip/myip6.
To restrict who can use the endpoint, control access at three layers:
- User permissions: Only grant the DDNS permission template to accounts that should update records.
- Zone ownership: A user can only update records in zones they (or one of their groups) own.
- Web server: Restrict access to
/dynamic_update.phpand/addons/clientip.phpby IP range or HTTPS-only if your update sources are predictable.
Security Considerations
- Use HTTPS: Always use HTTPS for DDNS updates to prevent credentials and updates from being intercepted.
- Create dedicated users: Create specific users for DDNS updates with minimal permissions.
- IP restrictions: Consider implementing IP restrictions for DDNS user accounts if your update sources have static IP addresses.
- Regular auditing: Periodically review DDNS activity in logs to detect unusual patterns.
Testing Your Configuration
After setup, you can test your configuration using:
curl -u username:password "https://yourserver.com/dynamic_update.php?hostname=host.yourdomain.com&myip=whatismyip&verbose=1"
A successful response in verbose mode will look like:
Your hostname has been updated.
Without verbose=1 you will just receive good\n (or one of the short error codes documented in Client Setup).
Troubleshooting
If you encounter issues with your DDNS setup:
- Check permissions: Ensure the user has proper permissions for zone editing
- Verify zone ownership: The user must own or have access to the zone being updated
- Check authentication: Verify credentials are correctly configured
- Review logs: Check Poweradmin logs for detailed error messages
- Test manually: Try manual updates with cURL to isolate client vs. server issues
For client setup instructions, see Client Setup.