Reverse DNS (PTR Records) Guide
This guide explains how to create and manage Reverse DNS (PTR) records in Poweradmin for PowerDNS.
What are PTR Records?
PTR (Pointer) records provide reverse DNS resolution, mapping IP addresses to hostnames. They are used for:
- Email server verification
- Security controls and authentication
- Network troubleshooting
- Server identification
Prerequisites
Before creating PTR records, you need:
- The appropriate reverse zone must exist in PowerDNS
- For IPv4: Create a zone like
1.168.192.in-addr.arpafor the 192.168.1.0/24 network -
For IPv6: Create a zone like
0.0.0.0.0.0.0.0.8.b.d.0.1.0.0.2.ip6.arpafor 2001:db8::/64 -
Proper permissions to add records to these zones:
- You need at least one of these permissions:
zone_content_edit_own- To edit zones you ownzone_content_edit_others- To edit any zone
- For creating reverse zones, you need:
zone_master_addorzone_slave_addpermissions
Method 1: Adding Individual PTR Records
For single PTR records:
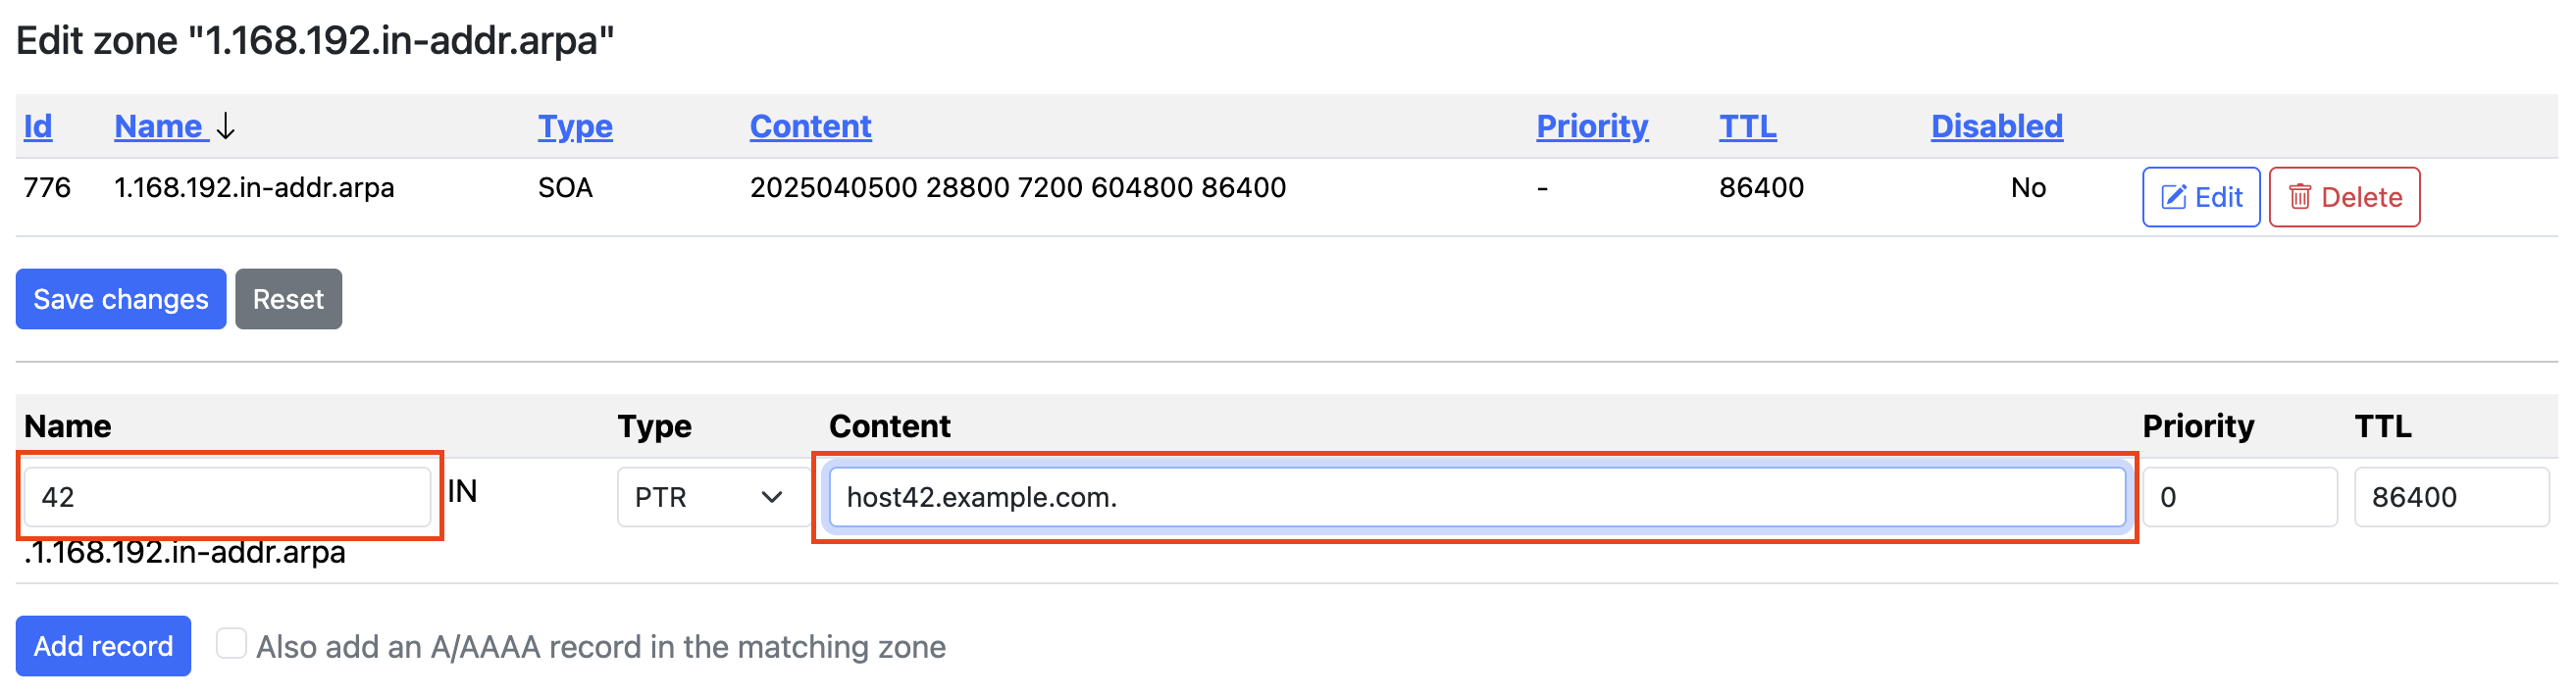
- Go to the reverse zone's record list (e.g.,
1.168.192.in-addr.arpa) - Click "Add Record" at the top of the zone edit page
- Enter the information:
- Name: The last octet of the IP address (e.g.,
42for 192.168.1.42) - Type: PTR
- Content: The fully qualified domain name (FQDN) this IP should resolve to (e.g.,
host42.example.com.) - TTL: Time-to-live value (e.g., 86400 for 1 day)
- Click "Add Record"
Method 2: Using Batch PTR Records Feature
For creating multiple PTR records at once:
- Access the Batch PTR Records feature:
- From the top navigation: Zones → Batch PTR Records
-
From the dashboard: Click the "Batch PTR Records" card
-
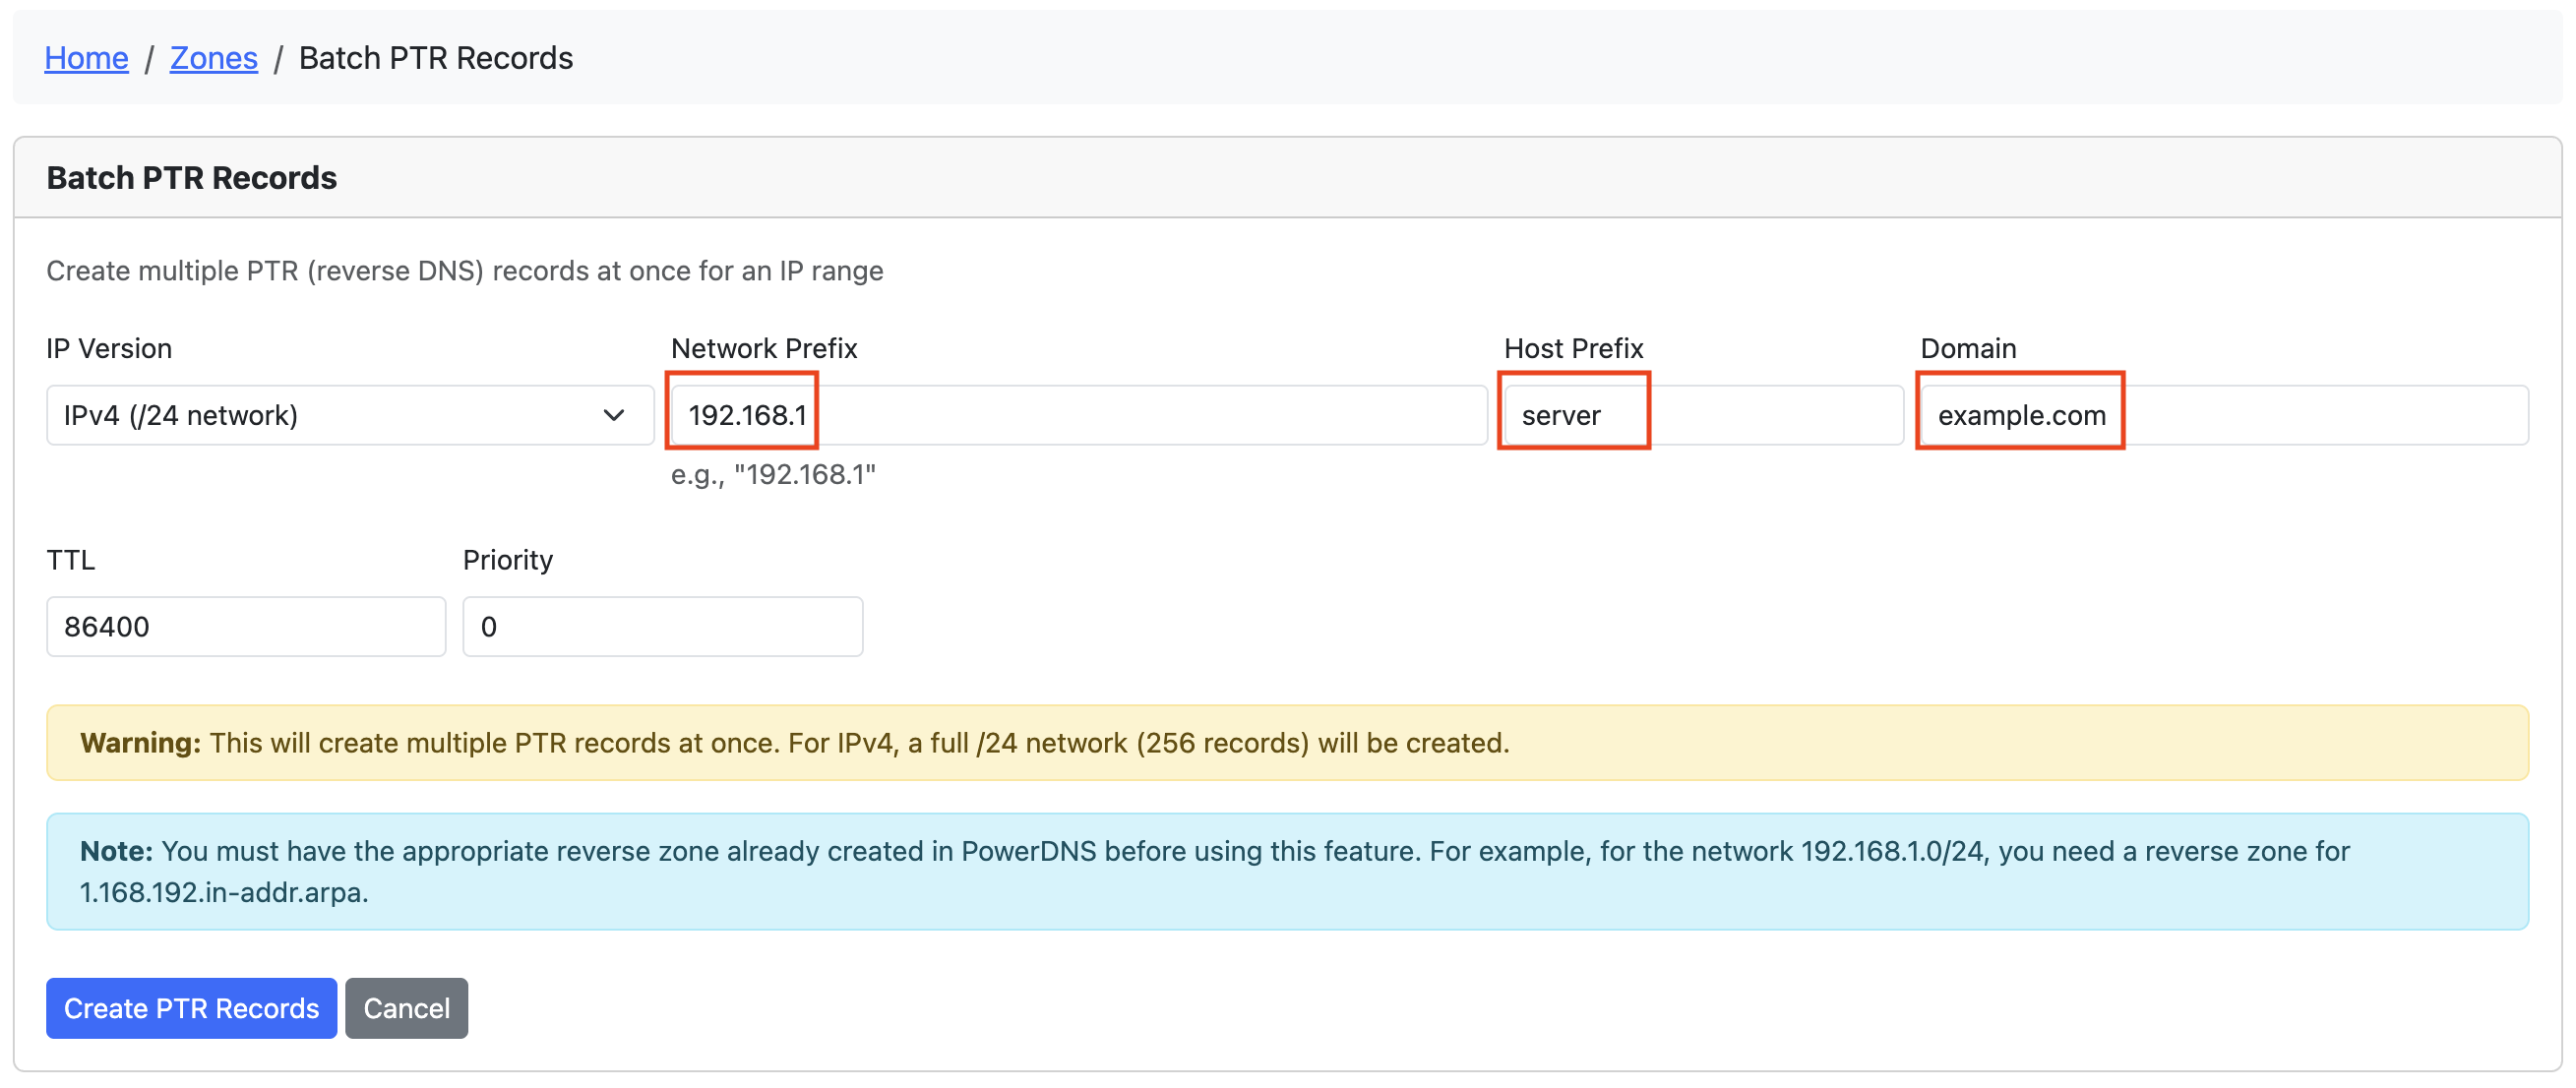
Complete the form:
- IP Version: Choose IPv4 or IPv6
- Network Prefix:
- For IPv4: The first three octets (e.g.,
192.168.1) - For IPv6: The /64 prefix (e.g.,
2001:db8:1:1)
- For IPv4: The first three octets (e.g.,
- Host Prefix: Base name for the hosts (e.g.,
server) - Domain: Domain suffix for PTR records (e.g.,
example.com) - Number of IPv6 Records: (IPv6 only) How many records to create
- TTL: Time-to-live value
-
Priority: Usually 0 for PTR records
-
Click "Create PTR Records"
Examples
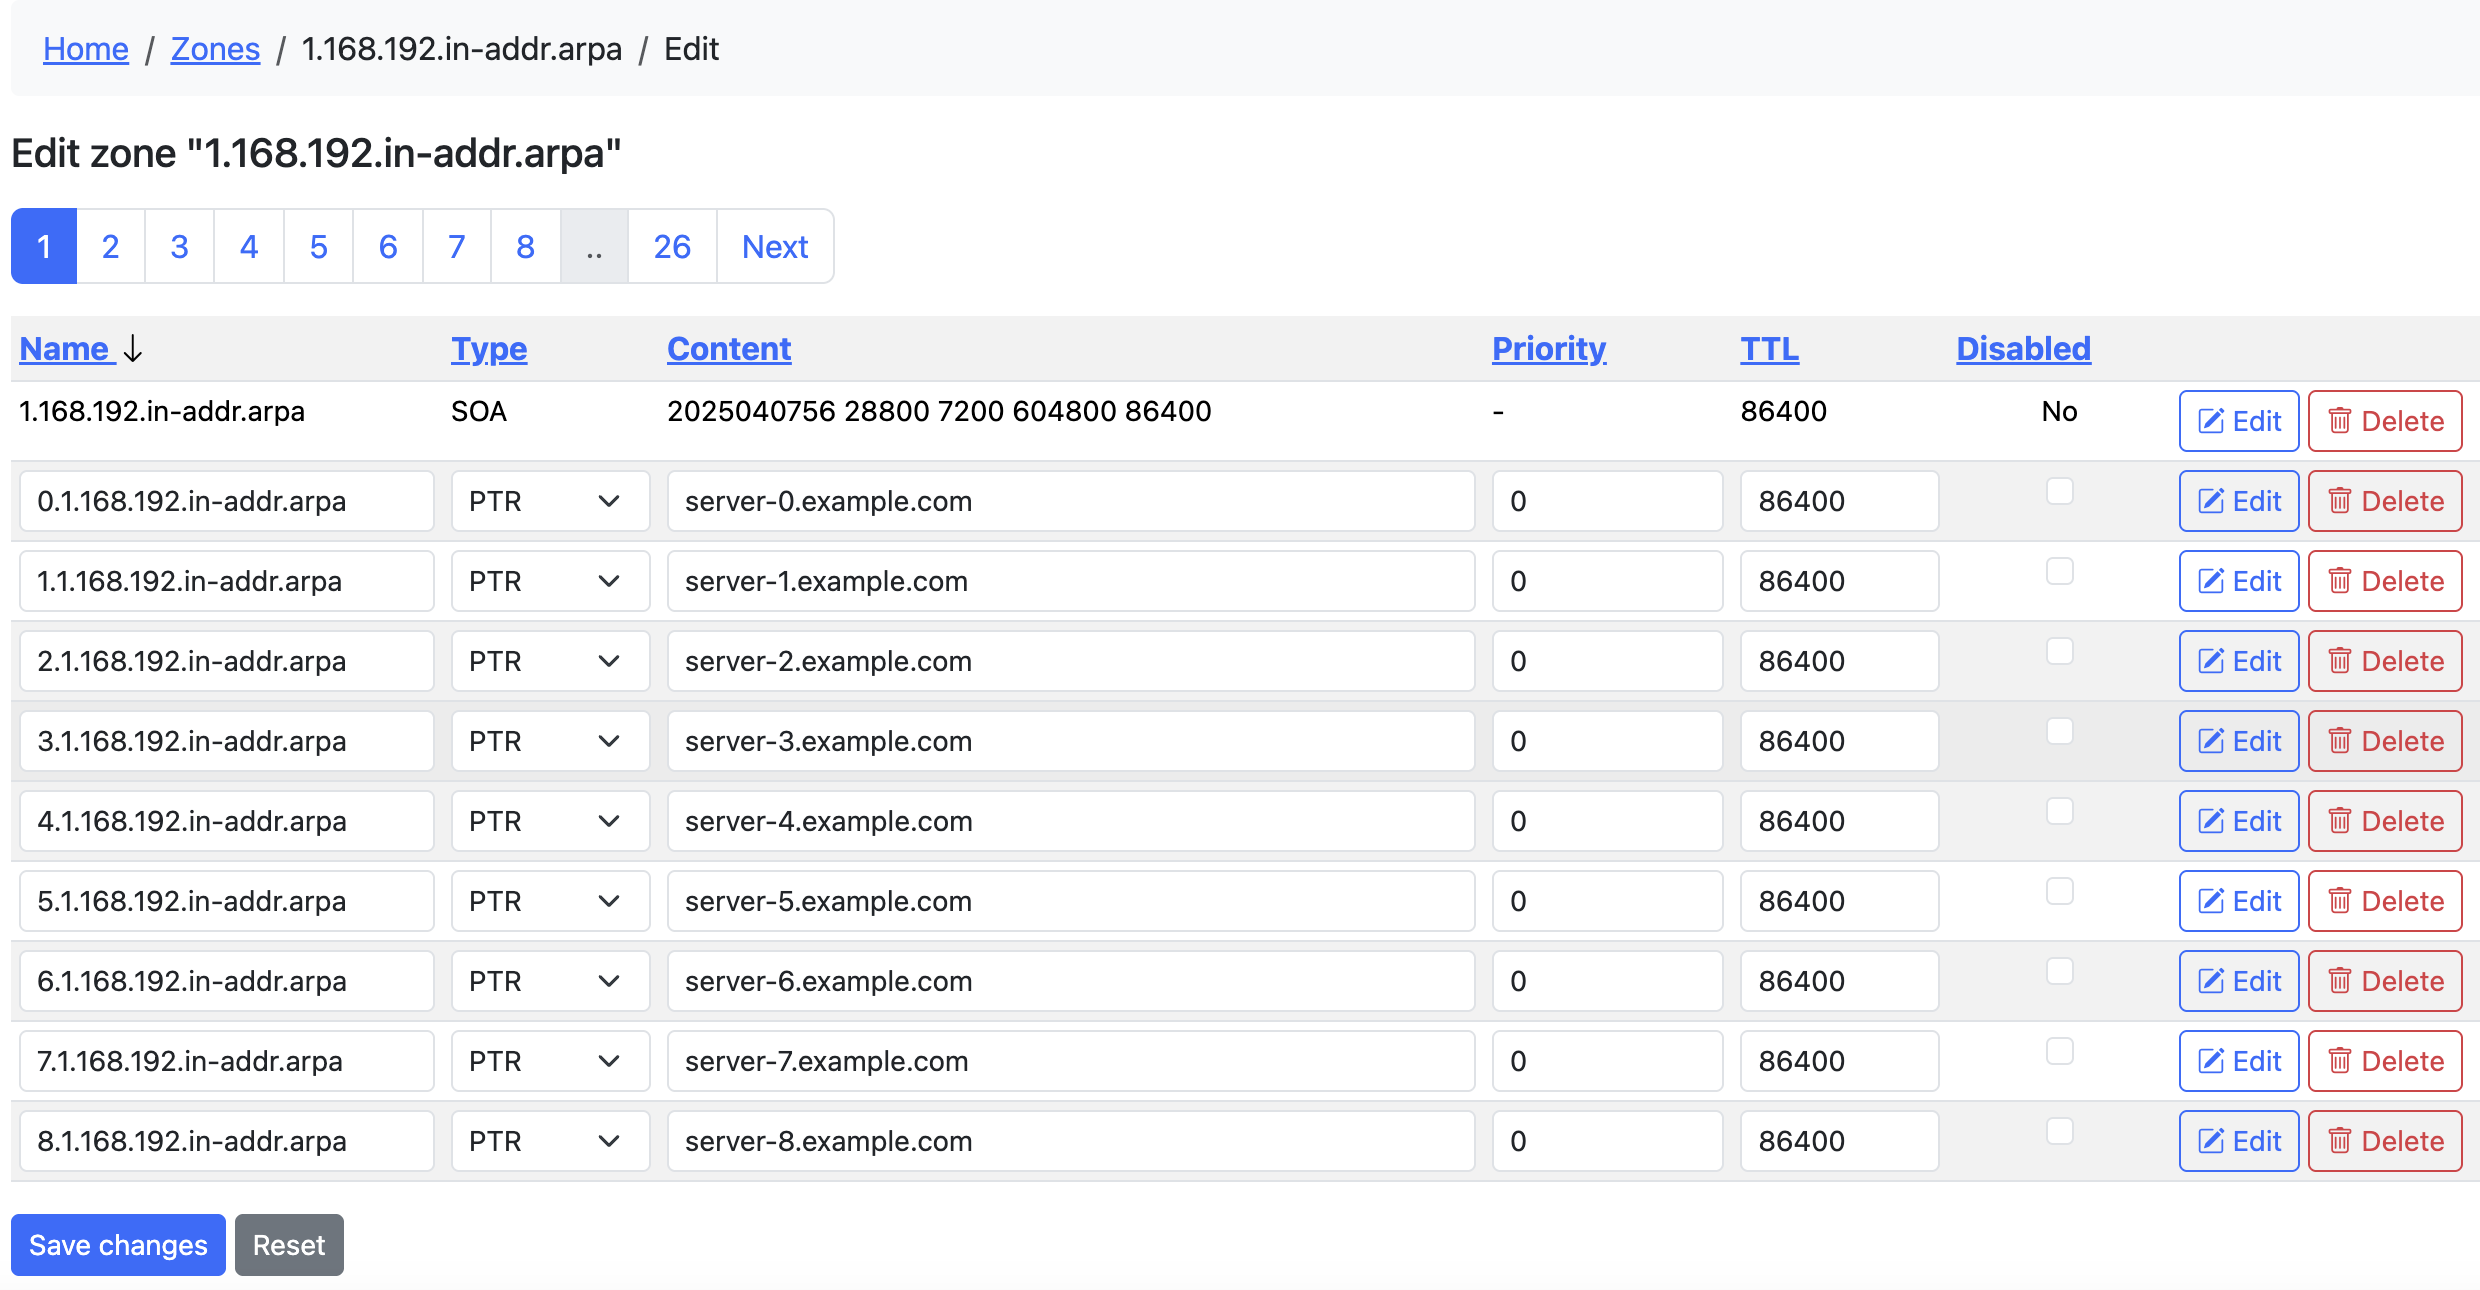
IPv4 Example
- Network Prefix:
192.168.1 - Host Prefix:
server - Domain:
example.com
This will create 256 PTR records:
- 0.1.168.192.in-addr.arpa → server-0.example.com.
- 1.1.168.192.in-addr.arpa → server-1.example.com.
- ...through...
- 255.1.168.192.in-addr.arpa → server-255.example.com.
IPv6 Example
- Network Prefix:
2001:db8:1:1 - Host Prefix:
vm - Domain:
example.com - Number of records: 100
This will create 100 PTR records with hostnames like vm-0.example.com through vm-99.example.com

Tips for Batch PTR Records
- Run Multiple Times Safely: You can run the batch tool multiple times - existing records will be skipped
- Progress Reporting: The tool reports how many records were created, skipped, or failed
- Reverse Zone Required: The appropriate reverse zone must exist before using this feature
- Automated Creation: All hostnames are generated automatically based on the pattern
{prefix}-{number}.{domain}
Permissions and Access Control
The Batch PTR Records feature follows Poweradmin's permission system:
- Required Feature Flag:
-
The
add_reverse_recordoption must be enabled in the Poweradmin configuration -
Required User Permissions:
- Either the
zone_content_edit_ownorzone_content_edit_otherspermission is required to access this feature -
When accessed from a specific zone page, you also need ownership of that zone (if using
zone_content_edit_own) -
Permission Hierarchy:
zone_content_edit_othersgives access to all zoneszone_content_edit_ownlimits access to zones you own-
No edit permissions means no access to batch PTR records
-
Administrative Setup:
- Administrators can assign these permissions through permission templates
- Users who can only view zones will not see the Batch PTR Records option
Troubleshooting
- No matching reverse zone found: Create the appropriate reverse zone first
- Permission denied: Ensure you have rights to add records to the reverse zone
- No records created: Check if records already exist (they will be skipped)
- Feature not visible: Check if you have the required permissions
Delegating a Sub-Range (RFC 2317)
When you own a /24 reverse zone but want a different team or client to manage PTRs for only part of it (e.g. 10.0.0.64/25), use classless reverse delegation as defined in RFC 2317. Poweradmin's ownership model is per-zone, so the trick is to create a smaller child zone for the sub-range and assign it to the delegate.
Example: Delegate 10.0.0.64/25 to a client
Parent zone: 0.0.10.in-addr.arpa (owned by you, covers 10.0.0.0/24).
Goal: the client manages PTRs for 10.0.0.64 through 10.0.0.127.
1. Create the child zone
From Zones → Add master zone, create:
- Zone name:
64/25.0.0.10.in-addr.arpa(slash notation - preferred) - Range notation
64-127.0.0.10.in-addr.arpais also accepted. - Owner: the client user (or a group the client belongs to)
Poweradmin's hostname validator accepts both notations. The slash form follows the RFC 2317 example syntax most resolvers and dig output assume.
2. Add delegation NS records in the child zone
In the new child zone, add NS records pointing to whichever nameservers will be authoritative for it (often the same servers as the parent).
3. Add CNAME glue in the parent zone
In 0.0.10.in-addr.arpa, replace the PTR records for the 64-127 range with CNAMEs pointing into the child zone. For each delegated address:
| Name | Type | Content |
|---|---|---|
64 |
CNAME | 64.64/25.0.0.10.in-addr.arpa. |
65 |
CNAME | 65.64/25.0.0.10.in-addr.arpa. |
| ... | ... | ... |
127 |
CNAME | 127.64/25.0.0.10.in-addr.arpa. |
These CNAMEs tell any resolver doing reverse lookup for 10.0.0.64-127 to chase the answer into the delegated child zone.
4. Client adds PTRs in the child zone
The client (who owns the child zone, not the parent) adds PTR records in 64/25.0.0.10.in-addr.arpa:
| Name | Type | Content |
|---|---|---|
64 |
PTR | host64.client.example. |
100 |
PTR | mailrelay.client.example. |
The client cannot edit the parent zone, and you cannot accidentally clobber their PTRs.
When you don't need RFC 2317
If you're delegating on an octet boundary - the whole /24 inside a /16, for instance - just create the child zone directly (5.10.in-addr.arpa under 10.in-addr.arpa) and assign the owner. No CNAMEs needed.
RFC 2317 only applies when the sub-range doesn't align with a DNS label boundary, i.e. anything smaller than /24 for IPv4 or anything not on a nibble boundary for IPv6.
Per-Record-Type Default TTLs (4.5.0)
Admins can configure default TTLs per record type from Tools → TTL defaults (/tools/record-type-defaults). Values stored there take precedence over the legacy dns.ttl_reverse config and dns.ttl fallback. The same default applies to every record-creation path (UI forms, batch PTR, the v1/v2 record APIs, RRSets, bulk records, and the DNS wizard) when the caller omits a ttl field. Leave a row empty to fall back to the legacy chain.
The fallback chain (first non-null wins):
record_type_defaultsrow for the submitted type (admin-managed via the UI above)dns.ttl_reversefor PTR records in reverse zones (legacy config)dns.ttl
Default TTL for PTR Records (legacy)
dns.ttl_reverse in config/settings.php is the legacy config-file knob that predates the per-type table. It still works as a fallback when no per-type row is configured: when set, it pre-fills the TTL field on the add-record form for reverse zones, applies to batch PTR creation, and is used for PTRs auto-created alongside a forward record. When unset, PTRs fall back to dns.ttl. Originally added in 4.4.0; extended to the v1/v2 record APIs, RRSets, bulk records, and the DNS wizard in 4.5.0.
'dns' => [
    'ttl' => 86400,
    'ttl_reverse' => 300, // 5 minutes for all PTR records
],
Best Practices
- Use meaningful host prefixes that identify the purpose of the servers
- Use consistent TTL values across your reverse zones
- Ensure your forward (A/AAAA) and reverse (PTR) records match
- Consider using shorter TTLs during migration periods