Zone Management
Zones are the core objects in Poweradmin. Each zone corresponds to a DNS domain (or reverse network) managed by PowerDNS. This guide covers creating, editing, and managing zones.
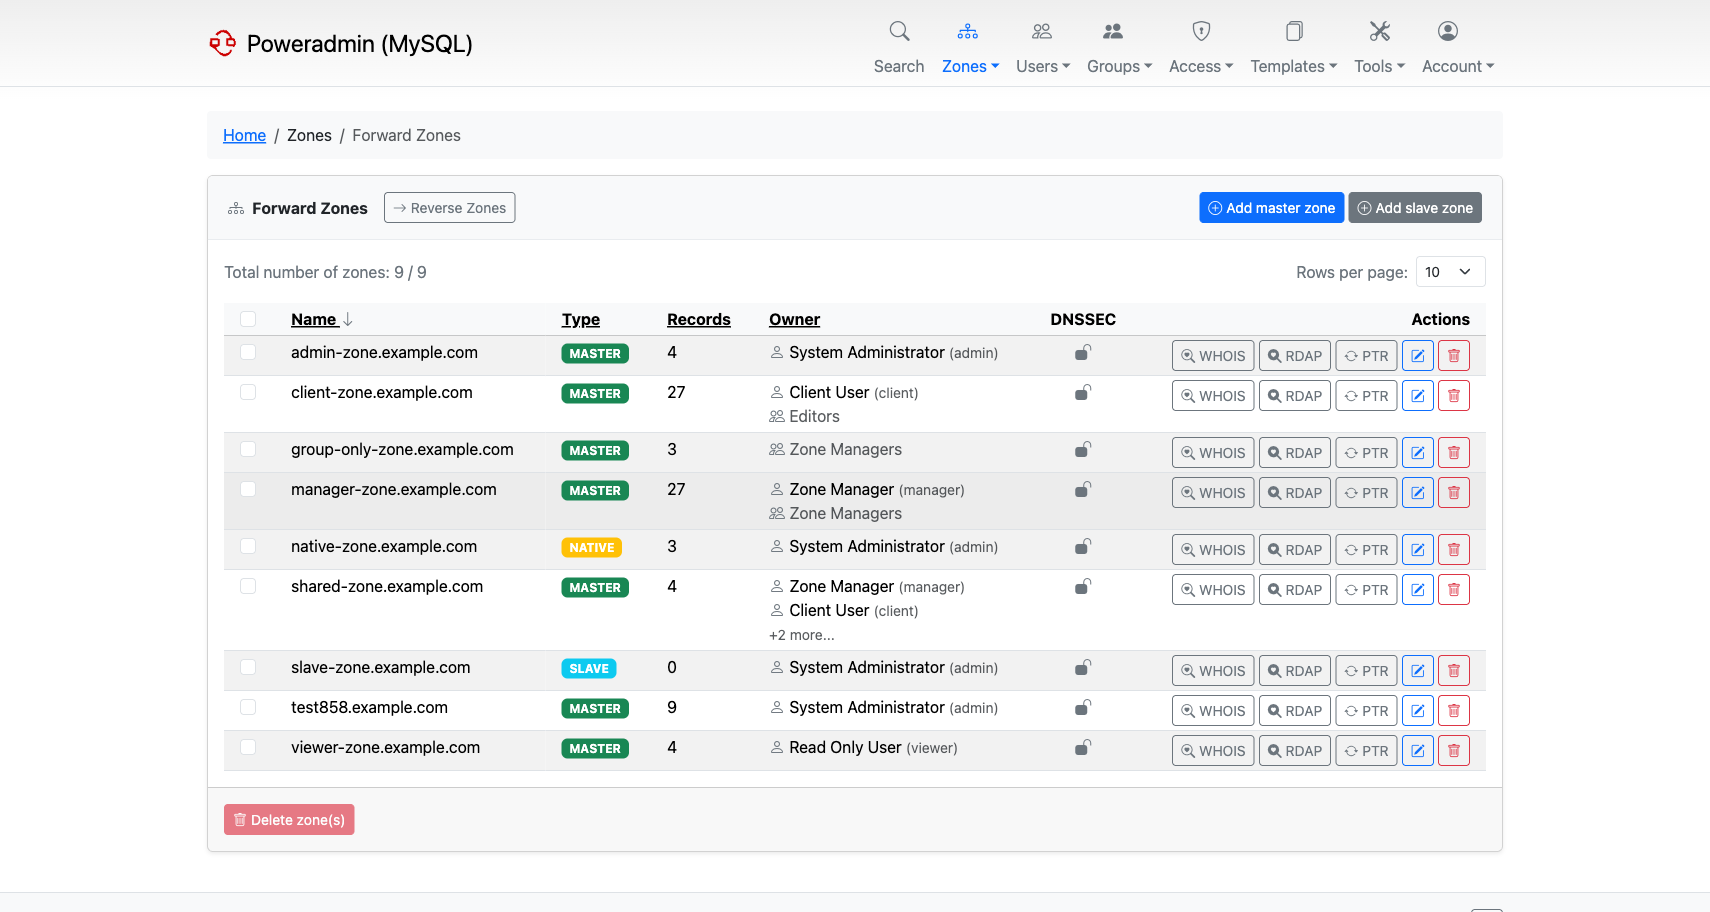
Zone Types
Choose the type based on your DNS architecture:
- Master - the authoritative source for the zone. Changes are made here and replicated to slave servers. Use this when Poweradmin is your primary DNS management interface.
- Slave - a read-only copy that receives updates from a master server. Use this when another DNS server holds the primary data and you want PowerDNS to serve as a secondary.
- Native - zones that rely on native database replication instead of DNS-based zone transfers (AXFR/IXFR). Use this when all your PowerDNS servers share the same database backend.
Tip: If you are running a single PowerDNS server, Native is the simplest option since no zone transfers are needed.
Catalog zones
PowerDNS 4.7 and later add two more kinds, used to distribute a list of zones between servers rather than to hold ordinary records. See Catalog Zones for the RFC 9432 semantics PowerDNS implements. Poweradmin offers them on the add-zone form only when the connected server reports 4.7 or newer.
- Producer - the catalog itself, on a primary. PowerDNS generates its contents from the member zones, so you do not add records to it by hand.
- Consumer - the receiving end, on a secondary. It works like a Slave zone and needs the IP address of the primary it transfers the catalog from, so the add-zone form asks for one when you select it. Because its contents arrive by transfer, no template or DNSSEC option applies.
Managing catalog members
Poweradmin can assign zones to a catalog from either end.
From the producer side, open the Producer zone and use the Catalog Members button on the zone editor. The page lists the zones the catalog currently publishes and lets you add or remove one at a time.
From the member side, open the zone and use the Catalog selector in the zone details block.
It offers every producer zone you are allowed to manage, plus none to take the zone out of its
catalog. If the zone is already in a catalog whose producer this installation does not hold, the
selector shows that catalog name marked not managed here and leaves it untouched unless you pick
something else.
Two limits come from PowerDNS itself:
- Only Primary (Master) and Producer zones can be members. PowerDNS serves a catalog from those kinds only, so other kinds would accept the setting and then never be published. Poweradmin hides the selector for them.
- A zone belongs to at most one catalog, so adding it to a second one moves it.
Membership is governed by the same zone meta edit permission that covers zone type, primary IP and template, and every change is written to the audit log.
Read-only zones
Secondary (Slave) and Consumer (catalog) zones hold records that PowerDNS replicates from a primary, so Poweradmin treats their records as read-only. In the zone list these zones show a muted Read-only badge next to their type.
For a read-only zone, Poweradmin blocks every record-changing action across the UI, API, and automation:
- Adding, editing, or deleting records (zone editor, DNS wizards, bulk add, batch PTR)
- Editing per-record comments and the zone comment
- Applying a zone template
- Importing records from a zone file
- Dynamic DNS (DDNS) updates
- The public API record, RRset, and bulk endpoints, which return a clear "read-only zone" error instead of a permission error
To change the records in a read-only zone, edit them on the primary server - the changes replicate automatically. You can still change the zone's own configuration (such as the Secondary master IP) and delete the zone itself.
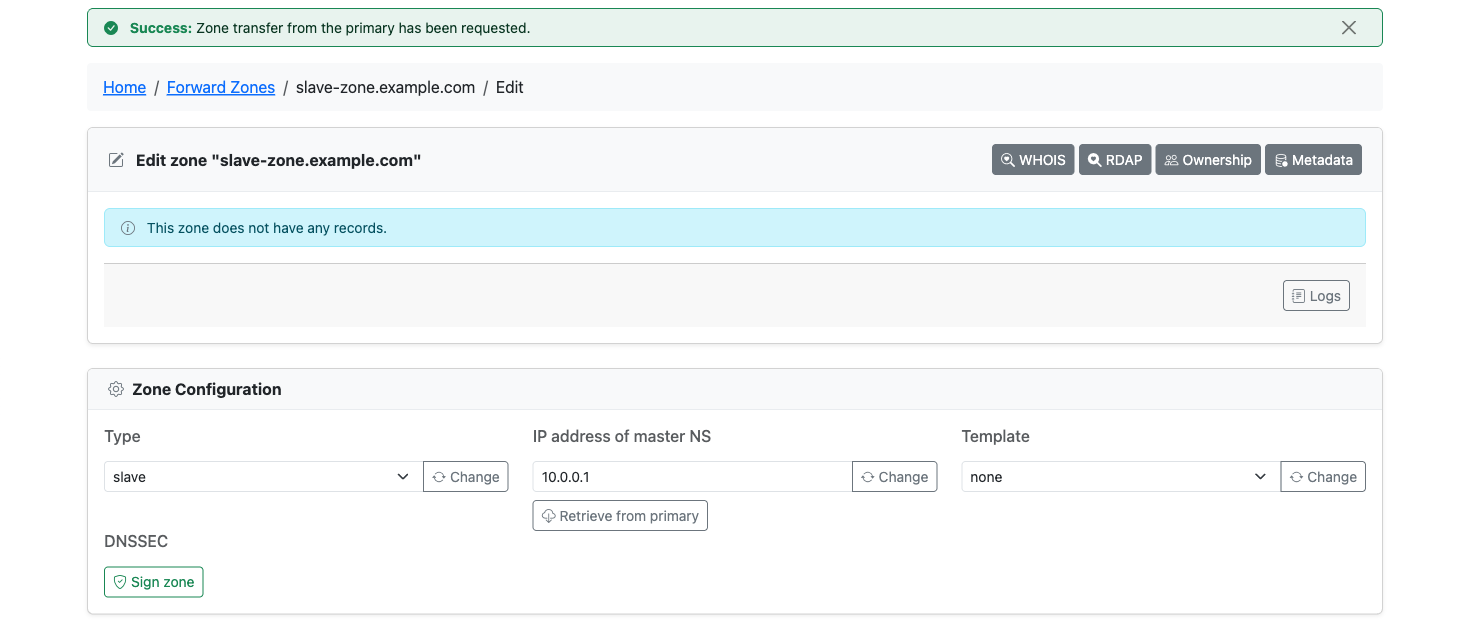
From 4.6.0, when Poweradmin uses the PowerDNS API backend, the edit page of a Secondary zone offers Retrieve from primary next to the primary IP. It asks PowerDNS to transfer the zone from its primary right away instead of waiting for the next SOA refresh, and reports whether the request was accepted. The button needs the zone meta edit permission. With the SQL backend there is no way to trigger a transfer, so the button is not shown and PowerDNS pulls on its own schedule.
Creating Zones
Adding a Master Zone
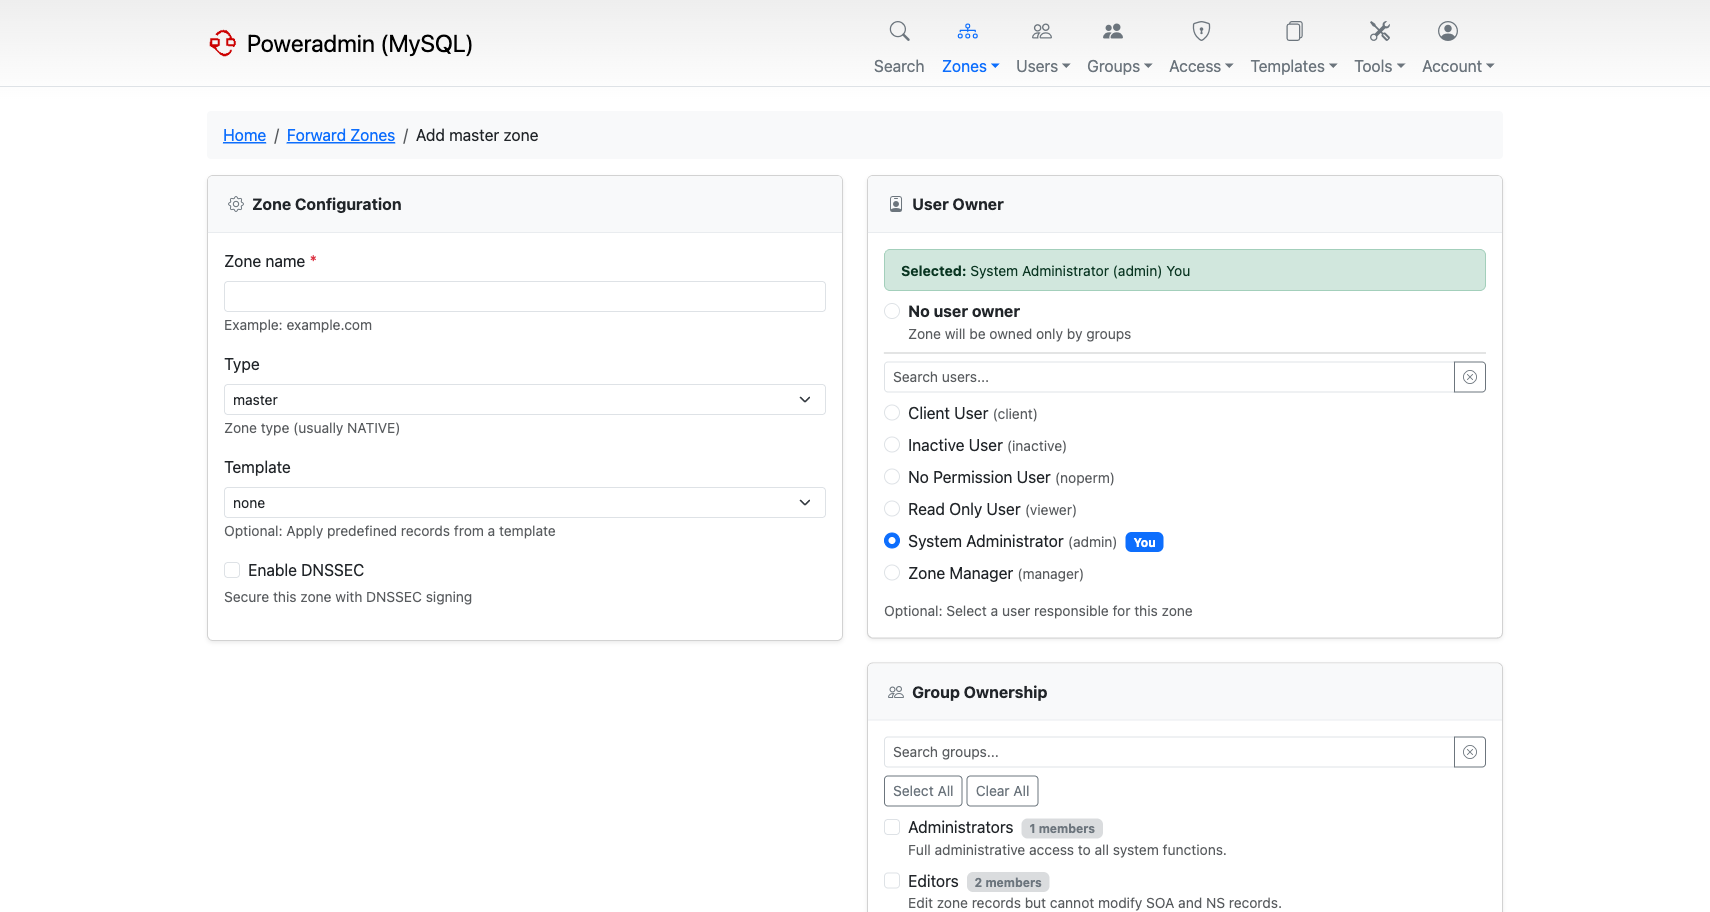
- Navigate to Zones and click Add master zone
- Enter the Zone name (e.g.,
example.com) - Select an Owner - the user who will manage this zone
- Optionally select a Zone template to pre-populate records (SOA, NS, etc.)
- Enable DNSSEC if you want the zone signed by PowerDNS
- Click Add zone
The zone is created with the records defined in the selected template. If no template is chosen, only a SOA record is created.
Adding a Slave Zone
- Navigate to Zones and click Add slave zone
- Enter the Zone name
- Enter the IP address of master NS that this slave will pull data from (several IPs can be given, separated by commas)
- Select an Owner
- Click Add zone
Slave zones are populated automatically by PowerDNS through zone transfers from the configured master server.
Zone Templates
Zone templates let you define a standard set of records that are added when creating a new zone. This is useful for ensuring every zone starts with consistent SOA values, nameserver records, and common entries like MX or SPF records. See DNS Templates for details on creating and managing templates.
Zone Editor
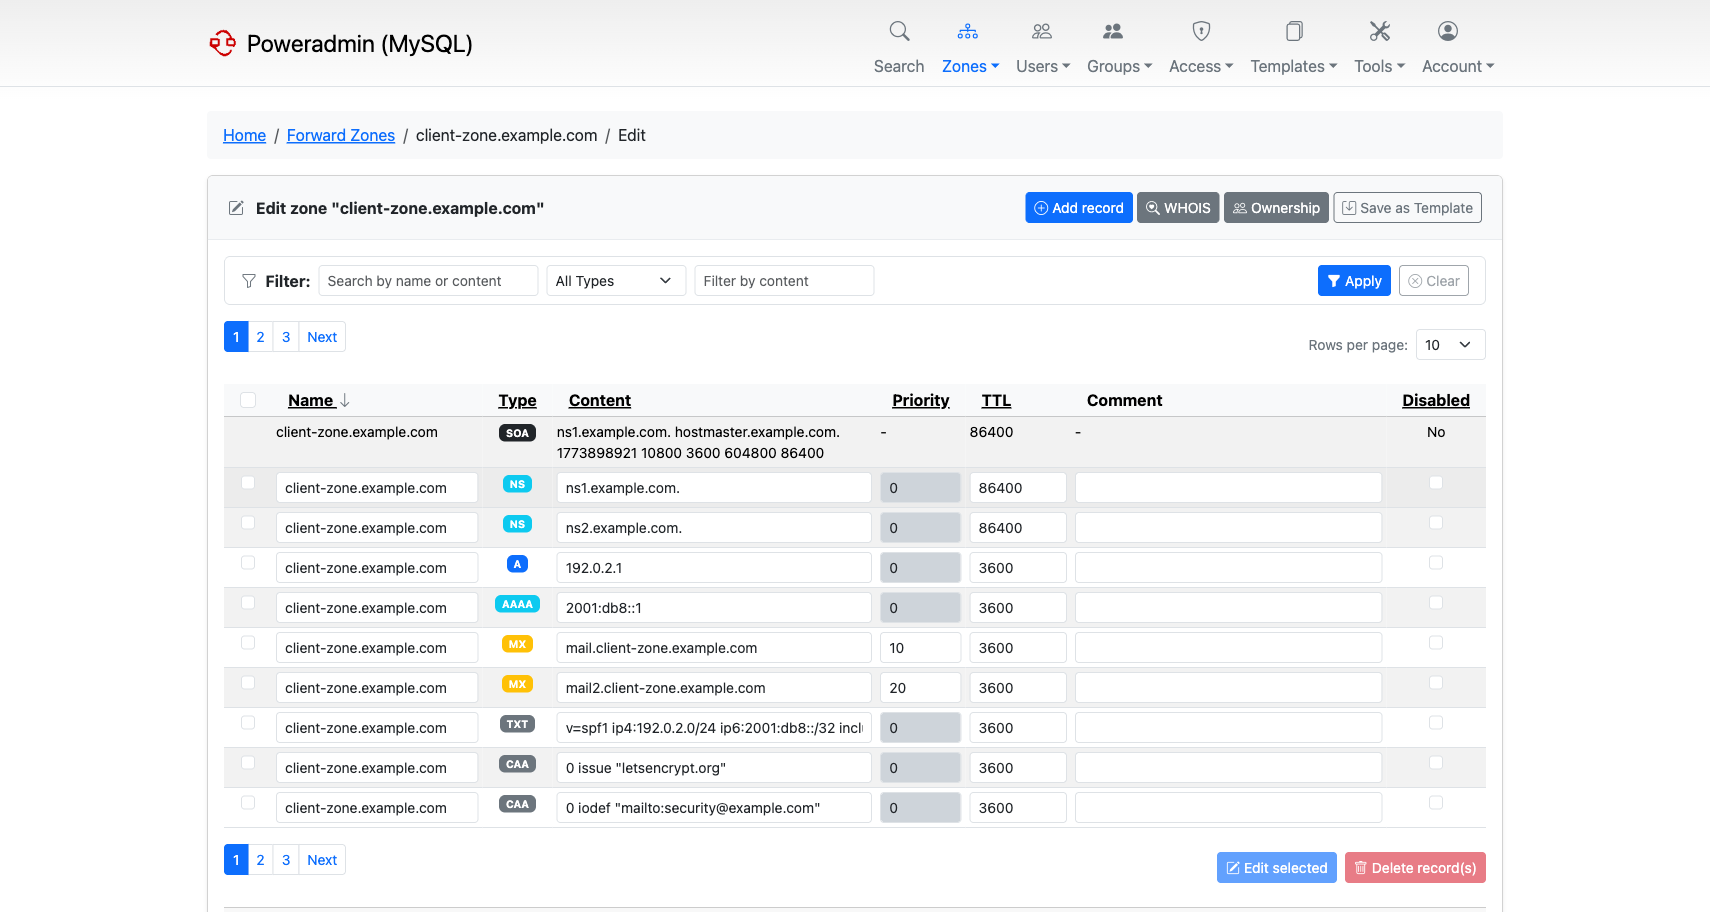
The zone editor is where you view and modify a zone's DNS records. It shows all records in a table with columns for name, type, content, TTL, and priority.
Editing Records
Records are edited in the table itself:
- Change the name, type, content, TTL, or priority fields directly in the record row
- Click Save changes to apply, or Reset to discard
Enabling interface.show_record_edit_button adds an Actions column with a per-record edit button that opens the record on its own page. It is off by default, as is interface.show_record_delete_button, so a default install has no Actions column.
Adding Records
By default the zone editor shows an Add record button that opens a separate page (/zones/{id}/records/add). Set interface.show_add_record_form to true to get an input row in the record table instead. Either way:
- Enter the record Name (just the hostname part, e.g.,
www) - Select the record Type (A, AAAA, CNAME, MX, TXT, etc.)
- Enter the Content (e.g., an IP address for A records)
- Set the TTL and Priority if applicable
- Click Add Record
Optional Columns
Two columns are optional, and both are off by default:
interface.show_record_id(added in 3.9.0) - adds the record ID columninterface.show_record_edit_buttonandinterface.show_record_delete_button(added in 4.1.0) - add the Actions column with per-record edit and delete buttons
Sorting
You can sort records by clicking column headers. This helps when working with large zones to quickly find specific records.
Zone Metadata
Starting in v4.3.0, the Metadata button on the zone editor opens an editor for the zone's PowerDNS domain metadata - the per-zone settings that control transfers, notifies, serial policy and DNSSEC behaviour. Each row is a metadata kind and one value; the PowerDNS page above defines what each kind does.
Kinds with a fixed set of valid values (SOA-EDIT, SOA-EDIT-API, SOA-EDIT-DNSUPDATE,
API-RECTIFY, NSEC3NARROW) offer a dropdown instead of a free-text field. Kinds your
PowerDNS version does not support yet are listed but disabled, with the required version
shown. Kinds not in the built-in list can be added through the Custom entry.
Some kinds accept several values - ALLOW-AXFR-FROM, ALLOW-DNSUPDATE-FROM, ALSO-NOTIFY,
TSIG-ALLOW-AXFR, TSIG-ALLOW-DNSUPDATE, GSS-ALLOW-AXFR-PRINCIPAL and PUBLISH-CDS. Add
one row per value. Every other kind holds a single value.
Two kinds are gated on the connected server's version, because PowerDNS added them recently:
SIGNALING-ZONE(PowerDNS 5.0+) - set to1on a signed zone using NSEC3 narrow mode to make PowerDNS synthesize CDS/CDNSKEY records for the other zones it serves, per RFC 9615.CATALOG-HASHand the catalog kinds appear on 4.7+ as described above.
Restrictions with the PowerDNS API backend
When Poweradmin talks to PowerDNS over its HTTP API rather than directly to the database, PowerDNS itself limits what can be written, and the editor marks the affected rows Read-only:
| Kind | Behaviour |
|---|---|
SOA-EDIT, SOA-EDIT-API, API-RECTIFY, NSEC3PARAM, NSEC3NARROW |
Writable, but stored as zone properties rather than metadata entries |
PRESIGNED, LUA-AXFR-SCRIPT |
Read-only - PowerDNS exposes no API route to write them. Use pdnsutil or the database |
ENABLE-LUA-RECORDS |
Neither readable nor writable over the API metadata endpoint. Use pdnsutil or the database |
AXFR-MASTER-TSIG |
Read-only - PowerDNS requires a TSIG key id, which Poweradmin cannot supply yet |
CATALOG-HASH |
Read-only - PowerDNS maintains it for catalog zones |
Two further rules apply in this mode:
- Custom kinds must start with
X-. PowerDNS rejects any other unknown kind. NSEC3NARROWneedsNSEC3PARAM. PowerDNS ignores narrow mode unless the zone also carries NSEC3 parameters, so the editor asks for both.
Editing a restricted kind reports an error rather than silently doing nothing. Apart from
CATALOG-HASH, which PowerDNS maintains itself and Poweradmin keeps read-only in both modes,
none of these restrictions apply when Poweradmin writes to the PowerDNS database directly.
Metadata over the API
The v2 API exposes the same data at /api/v2/zones/{id}/metadata, with GET, PUT and
DELETE on /api/v2/zones/{id}/metadata/{kind}. It enforces the same value vocabularies and
the same backend restrictions.
Reading requires the zone_metadata_view_own or zone_metadata_view_others permission (both
added in 4.5.0); anyone who may edit metadata keeps view access as well. PUT and DELETE
require zone_meta_edit_own or zone_meta_edit_others.
Bulk Operations
Starting in v4.0.0, you can add multiple records to a zone at once:
- Open a zone in the zone editor
- Click Add multiple records
- Fill in several record rows in the bulk form
- Click Add Records to create them all at once
This is particularly useful when setting up a new zone or adding a batch of similar records.
CSV Export
CSV export comes from the csv_export module, which is enabled by default
(modules.csv_export.enabled):
- Open the zone in the zone editor
- Open the Export dropdown and choose CSV (route
/zones/{id}/export/csv) - The browser downloads a CSV file containing all records in the zone
This is useful for documentation, auditing, or migrating zone data to another system.
Zone Ownership
Every zone has at least one owner. Ownership determines who can edit and manage the zone.
- User ownership - assign individual users as zone owners when creating or editing a zone
- Group ownership - assign zones to Groups so all group members get access based on the group's permission template
A zone can have both individual user owners and group owners simultaneously. Permissions from all sources are combined - if any ownership path grants a user access, they have it.
Note: When creating a zone, you must select at least one owner. Administrators can reassign ownership later.
Restricting Ownership Assignment
Starting in v4.4.0, the dns.zone_ownership_mode setting controls which ownership pickers are available on the zone creation form, the bulk registration form, the zone import form, and the zone ownership page:
both(default) - users and groups can both be assigned as ownersusers_only- only individual users can be assigned; the group picker is hiddengroups_only- only groups can be assigned; the user picker is hidden, and group membership is the sole way to grant zone access
Use groups_only to enforce group-based access management across the installation. The setting also applies to the API. API v2 supports group-only zones (pass owner_user_id: null together with group_ids). On 4.4.x, API v1 cannot create group-only zones and returns an error when zone_ownership_mode is set to groups_only.
Disabled Records
You can disable individual records without deleting them:
- In the zone editor, toggle the disabled checkbox on a record
- Disabled records remain in the database but are not served by PowerDNS
- Re-enable a record at any time by toggling it back on
This is useful for temporarily taking a record out of service during maintenance or troubleshooting, without losing the record configuration.
Zone Deletion
To delete a zone, click the delete icon next to the zone in the zone list, or use the delete option from the zone editor.
Starting in v4.1.0, zone deletion uses two separate permissions:
zone_delete_own- allows deleting zones you ownzone_delete_others- allows deleting any zone, regardless of ownership
Warning: Deleting a zone removes all its records permanently. This action cannot be undone. Make sure you have a backup or CSV export if you might need the data later.
See Permissions for a full list of available permissions and how to assign them through permission templates.